100%-Free Home Workout Program: Leaner, Stronger, Healthier In Minutes Per Day
I know what you're thinking: "I really love my gym because of the many different machines, dumbells, barbells, and other exercise equipment".
And yes, I'd fully agree!
Most home gyms don't offer close to the possibilities offered by the average gym. That limitation, however, doesn't mean you shouldn't exercise at a home gym.
So let's explore why it's smart to follow a home workout program:
Why Exercise At Home?
In fact, home gyms have their own huge advantages. Let's look at a few:
- You don't have to travel to the gym to get a workout in. Heck, even if you're only traveling for 5 or 10 minutes, you're still wasting hours a month if you're exercising multiple times a week. If you travel 15 minutes to the gym, 4 times a week, that's 2 hours a week, or 4 days a year that you're losing!
- Saving time also makes it easier to get a workout in. If you only have 30 minutes left in your evening, you're probably not going to visit the gym. A lightning-fast 10-minute workout in your living room, however, that's certainly possible.
- With home workouts, there's no peer pressure to exercise beyond your own capacity--although you can work out together with friends to push yourself beyond your limits. In other words, home workouts help you leave your ego at the door!
- Working out at home is usually much cheaper than paying for a gym subscription month after month, year after year. A $50-gym subscription costs you $6,000 per decade. For $6,000 (and far less) you can also buy a home gym that lasts a lifetime. Great investment!
In this blog post, I'll teach you everything you need to know about home workouts using bodyweight training.
Let's explore why:
Why This Course
I wanted to give you the complete tools to exercise at home, without ever needing to join a gym anymore - if you so wish.
Many people simply don't even know that they can have high-quality workouts from the comfort of their homes.
And contrary to popular belief, you don't need to invest thousands of dollars to get effective workouts in. In fact, the first part of this course focuses on bodyweight-only exercises that everyone should be able to use.
All these exercises can be used in such a way that complete beginners, intermediaries, and advanced athletes can get a good workout with them.
So it doesn't matter whether you're 75 years old and have had a hip replacement or a 25-year-old with 15 years of competitive sports experience. Literally everyone can get a good bodyweight workout in.
Interested?
Let's talk about why I'm uniquely qualified to talk about this subject:
About The Author
I'm Bart Wolbers and I've originally been educated as a Physical Therapist. During my time as a physical therapist, I saw a wide array of different patients, ranging from elite athletes to elderly 80-year-old grandmas who wanted to keep walking.
I've also got extensive experience with both weight training and bodyweight training. I'm able to complete 15 handstand pushups, do 20 pushups on one arm, can do one-legged squats (even with added weight), and I got close to doing one-arm pull-ups a few years ago.
I'm also pretty strong in traditional gym work. I've squatted just under 600 pounds, can do chin-ups with 110 pounds of added body weight, have done dips with over 220 pounds, strictly pressed 275 pounds above my head, etcetra, all weighing 220-230 pounds. So I'm practicing what I'm preaching.
So let's talk about how this course is built up:
How This Course Is Built-Up
The aim of this course is to make you self-sufficient with regard to a home exercise program. The course is divided into several parts:
- Bodyweight training (this post)
- Kettlebells
- Bands
- Yoga
- Barbells, dumbells, and a power rack
- Recovery methods
The first part of "bodyweight training" Is immediately visible. The other parts will all be available later on...
Let's first jump into a short history of bodyweight training to understand the principles better:
Exercise At Home Part 1: Bodyweight Exercises
Using bodyweight exercises is as old as human history.
From Roman and Greek wrestling to yoga in India, to ancient Chinese breathing exercises, all of them are possible without buying any gym equipment.
In fact, up until the 1900s gyms as people know them today didn't even exist.
Of course, there were "gymnasiums" where one could practice gymnastics. Some of the sports, such as wresting or running had also survived from ancient history.
But overall, gyms, as they are known today, didn't exist. Only after the 1940s did gyms with tons of different barbells, machines, and dumbells hit the market and become popular. The rest is history, of course.
So for most of humanity's history, therefore, people used very minimal exercise equipment.
Implication? You don't even need most of that gym equipment! You can become stronger, leaner, and healthier without a gym membership.
Why Bodyweight Exercises
Just take a look at a gymnast. That gymnast can probably pull him or herself up by one arm, has an extremely high vertical jump, and easily completes a set of one-arm pushups.
Other people have developed the ability to do thousands of pushups and squats in a period of several hours, thereby showing extreme endurance feats.
Of course, the abilities you develop with bodyweight exercises do not always translate to other athletic endeavors, such as strength in traditional gym lifts such as squats and deadlifts. But being very strong in the gym and benching 300 pounds doesn't translate in the ability to do one-arm pullups and pushups either, in many cases!
So bodyweight training strength and endurance make up a unique category of its own, independent from traditional barbell and dumbbell lifts. Keep in mind that I'm talking about the extremes of bodyweight development here.
You might not be at such a level nor even have the ambition for that development. That's why I'll begin with a very important principle:
Progressive Overload: The Key To Continuous Strength, Endurance, And Health Improvement.
Independent of what tool you're using for home workouts - whether that's bodyweight exercises or kettlebells - "progressive overload" always remains the most important principle (1; 2; 3)
"Progressive overload" means that the stimulus that causes the organism to adapt should increase over time.
Put in plain English, the only way your body gets stronger is by challenging it. That definition of "challenge" also changes over time. Right now, you may have difficulty running 2 miles. But after running twice a week for 4 months, running 2 miles at the pace you did 4 months ago is no longer challenging.
Hence, your body needs a continuous increase in taxation so that it's stimulated to adapt.
Everyone starts at their own level. If you're 80 years old, you might only need to stand up from a chair 10 times to stress your body enough so that it becomes stronger. If you're a 20-year old athlete, 30 one-leg squats might be needed to challenge you sufficiently.
The key point here is that exercise needs to be challenging. If (bodyweight) training isn't challenging your body won't adapt and get stronger. Hence, progressive overload is the main principle I'm working with in this guide.
So let's get into the different exercises considered in this guide. I've broken up these exercises into:
- Different squat variations, ranging from very easy to extremely challenging
- Pushup variations
- Row and pullup variations
- Ab exercises
- Walking, running and sprinting exercises
- (Advanced) handstand exercises
- Other accessory exercises
- How to build your own workout program, no matter what your fitness level
That combination of exercises allows you to train your entire body. So let's get into squats first:
Main Exercise: Squats, The Ultimate Lower Body Builder
Main muscles worked: quadriceps (front of legs), hamstrings (back of legs), glutes, calves (several muscles), lower back

What Are Squats And Why They Matter
What is a "squat"? Simple: you lower your upper body while moving your glutes to the floor, and thereby have your tights touch your calves.
Squatting focuses on all the major joints in your lower body, such as the ankles, knees, hips, pelvis, and spine. If you're not wearing shoes, your feet will get a good workout in too.
Many different squats exist, ranging from the very easy 2-leg squat in the chair where you use your hands as support, to a slow 1-leg squat with no arm support.
Squatting is one of the most basic movements humans can engage in. In many societies where chairs aren't omnipresent, for instance, squatting is a basic resting position.
Inhabitants of most hunter-gatherer societies also use that position to rest in.
Additionally, squatting is the position humans traditionally used to "visit the toilet".
Since the 1960s, however, the squat has also become an exemplary sign of athletic performance.
Today, many human beings are using their ability to squat heavy loads as examples of their lower-body strength and explosive power. What many people don't know is that you can train your legs with increasingly difficult types of bodyweight squats without using any weights.
Really?
Yes...
In this section, I'll show you how both your 80-year-old grandmother as well as that 25-year-old elite athlete can benefit from different bodyweight squats. Squats will benefit almost anyone's all-round performance.
But perhaps I don't have to tell you that...
Back in the early 2000s, when I started strength training, most men didn't train their legs in the gym. Traditionally, the chest muscles, deltoids, and arms were identified as the muscles "making someone strong".
During those early 2000s, I'd see men bench, train their abdominals, do a long arm workout, but 90%+ of men never trained their legs.
That's insanity...
Today, times have changed, and I see many men with steel tights and glutes - which is great! So now in 2020 having strong legs has something you can be very proud of.
(Don't worry, lots of upper-body work is included in this blog post as well!)
The ability to squat has become associated with a strong and healthy lower body. Your legs and trunk, in fact, are the entire foundation to the rest of your body. If you squat heavily, moreover, you'll also tax your lungs as a good leg training is enormously stressful to your body in the short-term.
Additionally, being a strong squatter will translate into many other different movements, such as pulling or pushing objects, running, moving up staircases, lifting objects, and many sports such as wrestling, ball sports (soccer, American football), etcetera.
Why not use barbell squats with a very heavy weight? Well, both bodyweight squats and barbell squats both come with their own advantages and disadvantages.
Barbell squats emphasize the back muscles to a far greater extent, while bodyweight squatting puts more emphasis on developing your leg muscles (I'm oversimplifying a bit here but you get my point).
Hence, barbell squats or bodyweight squats aren't "good" or "bad" - both have their advantages and disadvantages depending on what you're aiming at.
So let's now consider the squatting exercise itself, ranging from very easy to extremely difficult:
Intensity Buildup Of Squats:
As promised, I'm telling you how to choose the proper intensity for your squat workouts. As a physical therapist, I've coached both high-level athletes in their squatting as well as 80-year-old patients who needed to learn to walk again.
I, personally, consider the following buildup of intensity perfect for most people, ranging from low-intensity to very difficult:
- 2-Legged squats from a chair with arm support. This exercise is perfect if you're (much) older because there's no risk involved.
While sitting in a chair, you simply stand up on both legs, using your hands for your coordination or to remove pressure from your legs. The more you use your hands, the easier the exercise will get.
For older people, it's usually necessary to use their hands because you cannot get up without them. - 2-legged squats from a chair without arm support. After you've mastered the previous step, it's possible to remove your supporting hands from the equation.
For safety reasons, it's still possible to keep your hands very close to the armrest. During this exercise, you simply stand up and sit back down, which counts as one repetition. - 2-legged squats near an object you can grab onto. The next step is to freely squat without any chair below you but to ensure safety by squatting near an object that helps you pull right up again.
If you're 70 years old, for instance, and you're getting tired after 10 squats and almost fall down, you can use your hand to get back up is a very safe strategy.
Squatting up and down near an object you can hold onto also allows you to squat down deeper. Standing up and down from a couch usually limits how deep you can squat as your hamstrings (back of your legs) cannot touch your ankles that way. Squatting near an object does allow you to squat deeply. Hence, deep squats are suggested here. - Plain 2-legged squats, aka "squats". These are the squats as you know them: moving your buttock towards the floor and going back up.
Simple and effective.
If these squats are too difficult in their current form, you can begin by squatting down half-way first. Finally, over time, you can build up towards doing full squats.
Most healthy adults under 60 should be able to do 30-50 bodyweight squats without the aid of an object. - 1-Legged squats with support of the other leg. In this exercise, you take a very wide stance, so that most of your bodyweight is leaning on 1 leg. You then squat down on that 1 leg, while using the second leg as support.
This exercise - especially when higher repetitions are used - will be very challenging for most healthy adults. - 1-leg squat with arm support. Congratulations! If you can complete this exercise you're probably stronger than most adults and even young people!
Squat down on one leg, preferably until your tights touch your calves, while using an object like a doorknob to remove 10-20 kilograms (22-45 pounds) of pressure, especially in the lower part of the movement.
You can also use other objects such as a rain pipe, a table, or the kitchen table to relieve some pressure from your legs. Be creative! - 1-leg squats. At this point, you're stronger than 99% of adults. Almost no-one in today's society can squat down fully on one leg and come back up again - at least in developed nations.
I do assume here that you squat down fully without any support, and rise up again without any jerky movements.
And once you can do 20 or 50 one leg squats, you're at a world-class level.
Once you master these 1-leg squats, you can start adding weight, which will be covered in the next installment.
One-legged squats or "pistol squats" - bodyweight squatting mastery.
That's it...
The intensity buildup for squats no matter what your current strength and endurance level. If your goal is endurance, just focus on completing more repetitions on less difficult exercises. So you could aim for 100 bodyweight squats instead of trying five 1-leg squats with support.
Just to ensure you're carrying you the exercise correctly, let's focus on some guidelines for performing squats:
Guidelines For Performing Squats:
Bad form, over time, will lead to injuries. Hence it's smart to always use proper form and not let your ego dictate that you have to use more difficult squat versions without first mastering form first:
- Use a full range of motion as much as possible. A full range of motion, here, means that you're fully squatting down and not going a third of the way down, or just halfway down until your tights are parallel to the floor.
No, instead, full squats entail that your "ass goes to the floor", as the motto goes within the fitness community. - Your entire feet should stay on the ground. Hence, lifting your heels of the ground is a no-no.
The reason for that statement is that lifting your heels from the floor will place much greater pressure on your knees, long-term. Hence, if you habituate that movement pattern knee damage might result over time. - Align your knees and ankles. Don't let your knee buckle inward but keep your hips, knees, and ankles in one line.
Main Exercise: Pushups, The Perfect Upper Body Pushing Strength And Endurance Developer

Main muscles worked: pectoral muscles (chest), triceps (back of your arm), frontal deltoid muscles, rectus abdominis (front of your abs), obliques (side-abs) in one arm variations.
The next basic bodyweight movement: pushups.
My claim?
Everyone can do pushups! Why? Well, just as with squats, there's an intensity buildup from very easy to extremely difficult.
And sure, pushups are somewhat of an "unnatural movement". Your ancestors living 30,000 or 300,000 years ago would never have practiced pushups - they wouldn't waste their energy just like that.
And yet, that claim doesn't really matter. Species are evolving all the time and today, humans need a way to keep their bodies healthy. Pushups are a great solution for upper body strength and endurance.
Why?
Well, pushups work all of the major pushing muscles in the body around the chest, arm (triceps), and abs. Targeting these muscles is very difficult without any other bodyweight exercise.
Of course, in the gym, many exercises exist to work these muscles, such as bench presses, flyers, machine work such as peck deck, etcetera.
"Pushing" movements are also an important movement from human beings, simulating throwing movements humans would have traditionally performed. So let's consider how everyone can use their own unique pushup variation:
Intensity Buildup For Pushups:
So let's consider these pushups ranging from very light to extremely hard:
- Wall pushups. This pushup is very simple: you stand in front of a wall with a 30-40 centimeter distance (1 foot) and you push yourself up against the wall.
With this exercise, you'll only be using 10-20% of your body weight, so it's very, very light. So if you weigh 60-80 kilograms (132-176 pounds) you'll only use 6-16 kilograms (13-35 pounds) of resistance.
Even if you're 70 years old, you should be able to complete this exercise. - Pushups against an object at waist level. To increase resistance, you'll now pushup against (preferably an immovable) object at lower chest or midsection level. Due to the object being lower, gravity will increase the amount of bodyweight you have to support with your arms.
The kitchen counter is a great object to practice this pushup variation.
The lower the object, the greater the resistance. So if you put a chair against the floor and push yourself up against that chair, you'll further increase the resistance.
Of course, always make sure you're using an object that doesn't easily move. - Pushups on the floor on your knees. This type of pushup is perfect if you're a young person and not that strong.
By keeping your knees on the floor, you'll use about 40-50% of your bodyweight. Most young women will usually start with this pushup variation. - Regular pushups. You know the drill: lower your face, chest, and abs towards the floor and get back up.
With regular pushups you'll be putting about 70% of your bodyweight as pressure on your arms, shoulders and chest.
If you're pretty strong you'll be able to do 50-100 pushups without aid and pause. Most young men can only do 5-10 pushups at the maximum.
If you're overweight or obese, you may not be able to do a single pushup, so you'll have to start with pushups on your knees.
Once you're able to do a couple of regular pushups you've developed decent strength. - Small grip and wide grip pushups. After you get decent in regular pushups, it's time to spice things up and make pushups harder.
Either a very wide or very small grip will put your shoulder or elbow joints into a biomechanical disadvantage and increase the amount of effort it takes to complete a full pushup. - Clapping pushups. During this variation you push yourself up into the air, clap your hands mid-air, and land on both your hands. This variation is about equally as demanding as the small and wide-grip pushups.
- Regular pushups with an increased range of motion. For this exercise, you simply need some pushup handles.
Pushup handles allow you to stretch deeper into the elbow and shoulder joints, therefore allowing for a bigger range of motion. If you don't want to buy pushup handles, then any object will do, such as pushing yourself up to a few bricks or between chairs.
For the best results, elevate your feet as well so that you're not shifting weight to your feet when using pushup handles or another object. - Feet-elevated pushups.
Want more intense pushups? Shift even more weight to your arms and chest, and away from your feet. How? Elevate your feet and lean mostly on your arms.
With feet-elevated pushups you can shift more than 70% of your body weight to your upper body, making pushups harder. - One arm-assisted pushup. Now we go into the impossible territory for many people.
For this pushup variation, you basically perform a one-arm pushup while using your other arm as assistance. The second arm reduces the load your first arm has to carry.
Of course, you still want your main arm to work harder than the supporting one. This pushup variation is the stepping-stone to true one-arm pushups without support.
Most young men cannot perform this one arm assisted pushup.
The farther away you move the object away from your body, the harder your primary arm has to work to complete the pushups. Of course, over time, you'll build up to the ultimate variation: - One-arm pushups.
Most men, even athletic men, will never be able to perform a one-arm pushup in their lives.
If you can perform a few one-arm pushups you can be considered very strong, independent of your body weight. If you can do many, such as 20, you've achieved a world-class strength level.
Personally, I can perform about 10 of these at a bodyweight of ~220 pounds. Higher reps than that are still difficult for me though! - Mission impossible: one-arm clapping pushups. These pushups are both potentially dangerous as well as awe-inspiring.
For this variation you need more explosive power than with "regular" one-arm pushups.
Simply put, you carry out an one-arm pushup while also lifting yourself up from the ground and then clapping your chest while in the air. Again, this variation is somewhat dangerous so ensure you've mastered the regular one-arm pushup first.
Once more, that's it. All pushup variations from very easy to inhumanly difficult. Let's consider what to keep in mind when practicing pushups:
Guidelines For Performing Pushups:
Once again, a few guidelines to perform pushups:
- Stay tight and keep your body straight as a plank.
Many people who do pushups sag their abs so that their abs touch the floor or an object before their chests do. By sagging you decrease the range of motion your muscles around the shoulder, chest, and arm joints have to perform.
The proper way to do any pushup is to keep your vertebra and hips static so that you don't move in your back or hip joints. - Use a full range of motion whenever possible. You know the drill by now. Go all the way down, and go all the way up.
Half pushups can be used, however, as progressive overload to adjust yourself to more difficult forms of pushups. For instance, if you cannot do a full one-arm pushup you can do sets of 5-10 partial one arm pushups while practicing two-arm variations of pushups as well. - Find your natural shoulder width. How? If you push yourself up against the wall, most people automatically find their perfect shoulder width.
A narrower or wider shoulder width than "natural" usually leads to more weakness and a lower ability to complete many repetitions. - Mind your elbows and shoulders. Some people get elbow or shoulder problems for varying reasons.
You may not recover properly from your workouts, for instance, leading to problems down the road. Alternatively, you may not be using proper form or using a shoulder/elbow position that works well for your bodily structure.
The solution? Never train through the wrong kinds of pain. I know many athletes who have a nagging shoulder or elbow and yet continue to train with those injuries month after month, year after year.
Around age 30, everything "crashes" and they cannot train normally anymore.
Sure, "pain" is good in a sense, as long as it's good pain. With good pain I mean the pain you get when you're exerting yourself, such as strain in your muscles or pump.
A sharp pain in your shoulder, a nagging tendon in your elbow, or a diffuse pain on your sternum (chest) that lasts for weeks are examples of bad pain. Avoid that bad pain at all cost.
That's it, the second main exercise all laid out. Let's move on to pullups:
Main Exercise: Pullups, Foundational Back And Bicep Builder.

Main muscles worked: biceps, part of triceps, lattisimus dorsi (back muscles under armpits), middle back muscles around shoulder blades, deltoids
Pullups? Yes! The case can be made that pullups are a very natural part of human movement.
Why?
Simple: our primate ancestors climb and pull themselves up a lot and some traditional hunter-gatherer cultures still use this movement pattern up until today. You cannot remove a coconut from a tree without pulling yourself up, for instance.
Of course, most people will assist that climbing motion with their legs to save energy but the case can be made that the pulling movement pattern is a traditional part of human movement.
Secondly, pullups simulate the "pulling" movement that's very basal to the human condition. If you hunted a deer as an ancestor, for instance, then pulling it behind you or pulling the deer walking backward would be one way of moving it.
(Of course, carrying less heavy prey is also an option that would be used for longer distances.)
A Note On Pullups
To carry out pullups you usually need some equipment although not always. If you're already relatively strong and you're able to pull yourself up, then many natural places will exist where you can pull yourself up.
Stairways, trees, playgrounds and other objects supply endless possibilities to do pullups. These objects also allow you to train once you achieve an elite level of strength with one-arm pullups.
However, if you're lower on the scale of strength in pullups, you'll probably need some equipment to practice with. Gymnastic rings are perfect for all pullups variations. I'll talk more about that equipment in the exercises described in the next section:
Intensity Buildup For Pullups:
Here we go again: understanding pullups from extremely easy to insanely hard:
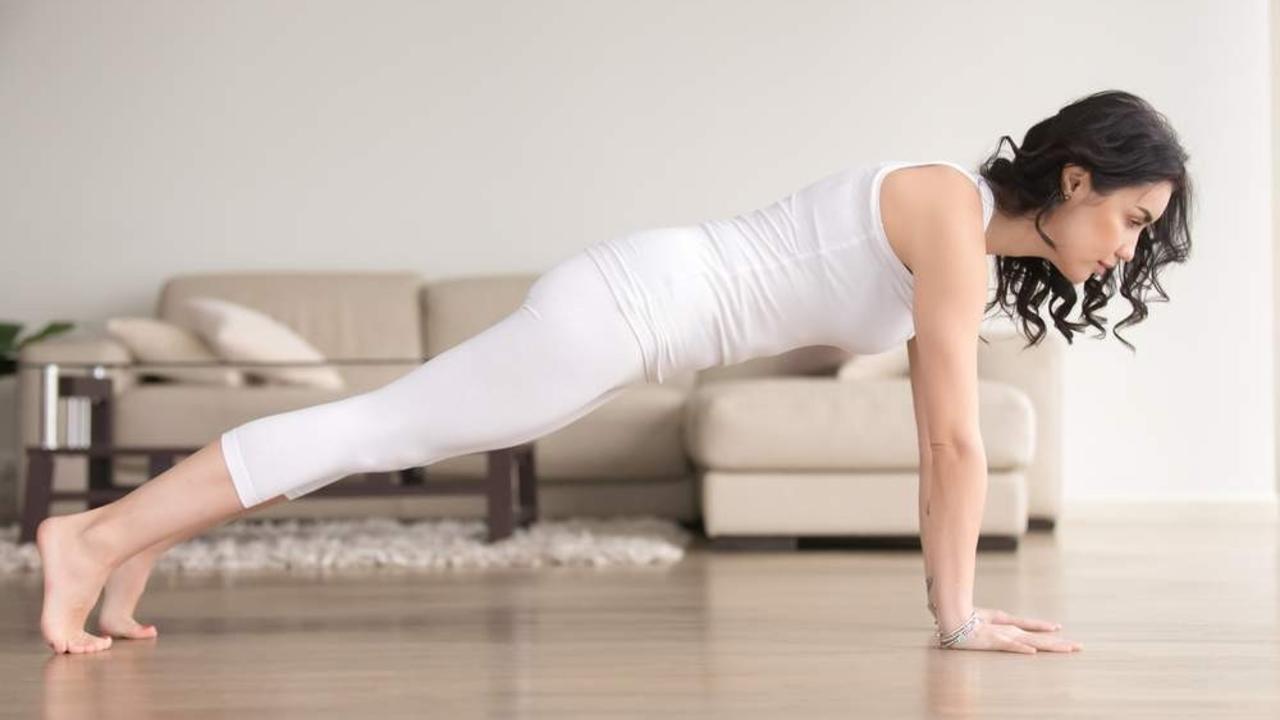
- Horizontal bodyweight rows with your feet planted on the ground. This exercise is pretty hard to imagine so I've included a picture:

The woman in that picture keeps her legs stretched, but to make the exercise even easier you can bend your knees so that your upper body has to process less weight due to the reduced leverage.
You don't necessarily need to use gymnastic rings for this exercise--a bar that you suspend in a powerrack also suffices. You can get really creative for this exercise, I've even used to handles of 2 very sturdy stools/benches to do this exercise.
If you want to make this exercise really easy, you can use a doorknob or door handle that you hang onto. The really easy variation is great for older people who still want to get a (safe) workout in.
Always make sure the object you're doing this horizontal pullup with is sturdy. - Horizontal bodyweight rows with your legs fully stretched. Simply put, here you follow the exercise as it is listed in the picture above.
Again, gymnastic rings or even TRX-bands are great although many other objects suffice as well if you're creative.
Make sure to build up to higher repetitions with this exercise, such as 20-30 per set, before moving on to the next difficulty level: - Assisted-chinups. Most bigger gyms have machines that allow you to offload part of your bodyweight today, allowing you to do chinups or pullups with only 50-90% of your bodyweight. That process makes chinups/pullups easier.
(Definition: "chinups" are usually defined as pulling yourself up with "supinated grip", where your hand palms face you. "Pullups" are done with "pronated grip", where the palms of your hands face away from you.)
However, you don't need an expensive pullup machine to carry out this exercise. What you need instead are simple plastic bands. Wrap a band over the pullup bar and stand into the band, which then offloads part of your bodyweight during the movement.
The picture below illustrates my point:
Of course, the stronger the band, the easier the exercise! So at first, you can use a very thick and strong band - eventually, you can build up to a very small one, build up the repetitions, and then transition into: - Regular chin-ups. Again, chin-ups are carried out with your hand palms facing your head.
If you've achieved this strength level, you're way above average, even for a male. The average young male cannot perform a few chinups today.
For the average female, this exercise is even harder. Even though women are lighter, they have proportionally less upper body strength than men.
Once you build up to 10-20 chinups, you're way ahead of most people in terms of back and biceps strength. - Pullups (including wide variations). Chinups and pullups emphasize different muscles.
Chinups emphasize the biceps muscle and long mid-back lattisimus dorsi muscle to a greater extent, while pullups target the trees major muscle directly under your armpit more (higher up your back).
Pullups (with your hand palm facing away from you) are also biomechanically harder because your back muscles are in a weaker position.
The wider your grip, the harder the exercise becomes for the back muscles under your armpits. - L-sit pullups. These are simply pullups with your legs facing straight ahead, in an L-form.
Because you're using more muscles at the same time, specifically your frontal abs as well as your hip flexors (upper leg and lower ab muscles that pull your legs towards your abdomen) this pullup version is harder than regular ones.
Wide-grip L-sit pullups are probably the hardest variation. Once you master these pullups by being able to complete many repetitions, it's time to move on to the next variation: - One-arm-assisted pullups. Once you can do these pullups you're freakishly strong. Same as with pushups, you pull yourself up on one arm while using your other arm as assistance and lower the load.
Another way to do the one-arm-assisted pullups is to use bands to lower the load. - One arm horizontal pullups. Remember the horizontal pullup exercise treated early in this section? This time around you're using just one arm to do these horizontal pullups.
For most men, horizontal pullups are very challenging because you'll be using about 60-70% of your bodyweight with one hand here. The muscles worked during this exercise are a bit different from the vertical pullups - the middle and upper trapezius and rhomboid muscles between your shoulder blades and neck are emphasized to a greater extent here. - Negative one-arm pullups. On your way to one arm pullups it's probably best to easy slowly into them.
How?
By learning to lower yourself slowly with a one-arm pullup first. Make no mistake: just lowering yourself in a chinup/pullup motion on a bar is already freakishly hard and far beyond the capability of most human beings.
Be very careful with this exercise as well: the risk of elbow or back muscle injuries is higher with this exercise because so much pressure is placed on many bodily structures. Hence, warm up very well before attempting this exercise.
If you're practicing one-arm pullup negatives make sure to favor quality over quantity. With "quality over quantity" I mean that it's better to do 1 very slow repetition than to do 5 quick ones.
With this exercise you're essentially trying to get your body accustomed to the pressure of pulling yourself up on one arm - using gravity as your help instead of detriment. - One arm pullups. At this point you're the king or queen of strength! I've never achieved this level myself even though I could do chinups with 50 kilograms (110 pounds) of added bodyweight and pullups with 30 kilograms (65 pounds) added.
Very few people achieve one-arm pullups in their lives, defined as pulling your chin above the bar from a dead hang. And if you can do multiple pullups
Clear?
Once again, anyone can practice this pullup movement.
Just as is the case with pushups though, make sure you're 1) keeping your body stable as a plank, specifically your spine; 2) warm up well and don't over-exert yourself if you get elbow or shoulder pain; 3) experiment with different shoulder withs: closer or wider grips might feel better or worse - the only way to know for sure is to try.
Moving on:
Main Exercise: Ab Exercises
Main muscles worked: rectus abdominis (front of abs), hip flexors (ab muscles ranging from your spine to your upper leg), and other muscles around the lower spine.
Most of the exercises I've covered previously such as pullups, squats, and pushups, all target your abs to a certain degree. However, none of these exercises will hit the abs as hard as targeted exercises can.
I'm specifically talking about the big ab muscle originating on your ribs which runs to your pelvis. Then there's also the side abs that connect your ribs to your pelvis diagonally.
Now, traditionally, I consider the main function of these muscles to prevent rotation or the moving sideways of your spine. When you're running or throwing an object, for instance, these ab muscles mainly have a stabilizing function.
My point?
Your ancestors 50,000 years ago wouldn't have "trained" their abs by doing hundreds of crunches on the floor. Instead, hunting and gathering activities would have determined how these muscles were used, and in almost all cases, that's not while you're laying on the floor.
Disclaimer: if you're older and don't have the ability to get up from the floor then skip these ab exercises and mostly focus on squats and lunges. During my time as a physical therapist, I've worked with people of 80 years old who used a walking aid - in such circumstances, there's risk involved getting on the floor because you might not be able to get back up.
So let's get into these ab exercises.
Intensity Buildup For Ab Exercises:
- Crunches. I've only included this exercise because almost everyone can do some crunches.
To complete a crunch, lay with your back on the floor. Then, slightly raise up your head and chest. Keep your lower and middle back pressed against the floor.
With crunches, you're not coming up all the way but you're only raising the upper part of your body.
Most people, almost independent of age, should be able to do some crunches. - Situps. Everyone knows situps. You fixate your legs under an object, such as under the couch. Next, while laying on the floor and your hands behind your head or in front of your chest, you pull your body up so that you're upright.
Once you're able to do 15-25 situps, move to the next exercise. - Leg raises. This exercise can be practiced simultaneously with situps. Ensure you're laying on the floor on your back with your legs stretched out.
Then lift your legs into the air until your legs are pointing at the ceiling or sky. At that point there should be a 90-degree angle between your hips and back.
If doing this exercise with straight legs is too difficult, try flexing your knees a bit. With flexed knees, leverage decreases so that your abs and hips have an easier time. - Planks on knees. View the picture of a plank below:

Instead of supporting your weight on your toes, you're going to put weight on your knees. Doing so will reduce the leverage under which your abs have to work and thus make the exercise easier.
The most important cue during this exercise is to keep all joints of your body in a straight line. So your spine, hips, and knees, should literally be aligned in a straight like - like a "plank". If you sag with your hips, for instance, you make the exercise easier. Sagging is thus cheating.
Make sure to build up to 60-90 seconds of this easier plank before moving onto the next exercise: - Planks. This exercise has gotten famous for good reasons: it's very simple and yet, most people who are untrained have lots of difficulty with this exercise - especially if you're heavier.
Again, all the joints of your body, ranging from your spine to your hips to your knees and ankles should be in a straight line. Lowering your head or your hips is cheating because the exercise gets easier that way.
Of course, after holding the plank for some time some muscles will give out so that's when you know you're working hard. - Side Planks. This type of plank is similar to the regular plank except that you're planking side-ways now:

You can practice this exercise simultaneously with the regular "front" planks.
In this exercise, ensure that your spine, hips, knees, and ankles remain in a straight line. If your hips are sagging then you're cheating.
At this point the ab exercises are getting very difficult: - Hanging leg raises.
Just as with pullups, you need a location to hang from to perform this exercise. You can use the stairs or a playground to carry out this exercise, for instance.
(Using gymnastic rings can help you do these hanging leg raises.)
Just as with the regular leg raise, you raise your legs up in a straight line. Doing so will work both your front abs as well as your hip flexors (muscles that run from your upper legs to your lower spine). - RKC-plank. "RKC" stands for "Russian Kettlebell Challenge". The RKC changed the original setup of the plank slightly to make it infinitely more difficult.
Instead of just holding a normal plank, now you're actively pulling both your toes and elbows & lower arms towards your abs. In other words, you're exerting maximum pressure into the floor. And because you cannot move that floor with your toes or lower arms, you're able to generate infinite amounts of pressure on your abdominal muscles.
The RKC plank is carried out for 5-6 seconds per set, but, always at maximum intensity. Hence, you go all out in pulling your elbows and toes towards your midsection for 5-6 seconds, and then you rest.
The benefit of this exercise is that it's much more realistic with regard to how your abs work in real life. In real life, with almost any activity, your abs never have to perform many repetitions over a long period of time. On the contrary, your abs are either 1) used explosively, such as when throwing an object; 2) stabilize your movement for longer periods of time. - Ab wheel or another object. An ab wheel is a dreaded object because of the immense soreness it produces in many people if they've never done this exercise before.
The ab wheel is simply a wheel with 2 handles that allow you to roll out in front of you and tax your abs at a very disadvantaged angle:
This exercise is easiest when done on your knees. Once you can perform a few repetitions on your toes, moreover, then you've achieved a world-class level of strength in your abs.
Start slowly with this exercise because it's possible to injure yourself due to the sheer amount of pressure placed on your abs (and other muscles helping with stability, such as those around your back and hips). - Dragon flag plank. This exercise requires almost-superhuman strength in your abdomen.
The dragon flag is carried out while lying on your back, putting your feet and lower torso into the air with straight legs. Next, you lower your legs all the way to the floor and come back up, pointing your legs straight to the sky.
You'll also need an object to fixate yourself with as counter-resistance:
Of course, the dragon flag plank is extremely difficult - you'll have world-class ab strength once you can complete these.
Guidelines For Training Abs:
Many misconceptions exist around abs, such as the belief that training your abs will help you burn body fat or that abs need to be trained every day (contrary to other muscle groups).
Both statements are obviously false.
Training your abs will not lead to fat loss any quicker than training other body parts would. In fact, training bigger muscle groups such as your back and legs might lead to more bodyfat being burned simply because those exercises are far more taxing on the body than training the small ab muscles.
My suggestion: practice your ab exercises like you would practice training your squats, pushups, and pullups. No need to think of your abs as "special" muscles that need a different treatment.
(Yes, I'm aware that different muscle fibers are made up of more or fewer fast-twitch fibers and therefore might need to be trained differently from each other, but, I'm not trying to overcomplicate things and I'm trying to keep this work accessible to as many people as possible.)
Additionally, keep your neck in line with your upper spine during all these ab exercises. Some people get neck pain due to excessively flexing their neck...
Moving on to the ultimate all-round bodyweight movement:
Main Exercise: Walking, Running, Sprinting
Main muscles worked: almost every muscle in the human body is targeted in one way or another.

No exercise is as universal and foundational to human movement patterns as moving on your 2 legs in different ways.
Of course, kids all begin with walking, then run, and are finally able to sprint quickly. Adults, of different ages, are usually able to run and may sometimes be able to sprint (without injuring a muscle).
My point?
If you're 35 years old, or even 55 years old, you should be able to sprint at a reasonable capacity. If not, it's something you need to work on in order to be considered a person with healthy structural bodily integrity.
And while I know running or sprinting is not possible for everyone at home, usually, people can find a way to carry out such exercises.
I also want to distinguish between walking on the one hand, and running or sprinting on the other hand.
Walking I consider a foundational exercise that's not really intense but still has enormous health benefits (4; 5; 6).
Running and sprinting, however, are more intense and people are far more prone to get injuries compared to walking (7; 8; 9; 10).
So if you ever run or sprint, always make sure to warm up correctly. Nonetheless, I consider the inclusion of some sprinting universally necessary for any home workout program if you're generally healthy.
Just to be clear:
Would I recommend 100-meter (~320 feet) sprints to an 80-year-old person with poor coordination?
Never...
But, do I think a healthy 30 or 60-year-old person with no obvious physical or mental limitations should sprint? A resounding "yes"! The reason is simple: both running and sprinting played a major role in human evolution (11; 12).
Hence, I consider running and sprinting more important than more cardiovascular demanding activities such as riding a bike or an elliptical workout.
Can the latter options have benefits to your health? Sure! But your ability to walk, run, and sprint is far more primordial.
My suggestion?
Include some 20, 50, 100, 200, and even 400-meter sprints into your weekly routine. Alternatively, you run for a few miles once in a while.
Once again, you cannot engage in that exercise directly in your home in most cases (unless you've got a treadmill but I'm assuming that most people can still move around freely in their neighborhood.
To warm up, make sure to include some sprints at 70, 80, and 90% of intensity. Doing so dramatically lowers your injury risk.
(I'll tell you how to incorporate sprints into your workouts in a later section.)
Advanced: Handstand Variations
Main muscles worked: deltoid and trapezius muscles around your shoulders and neck, mid-back muscles between the shoulder blades and spine (rhomboids, middle and lower trapezius), triceps (back of your arm).
After you're reasonably good with pushups, like being able to perform 30-50 regular pushups and 10-15 clap pushups, it's time to include handstands and bodyweight handstand presses as well.
The reason for including this exercise is because it's a very different movement pattern from pushups and works different muscles.
Handstand and handstand pushups will work your deltoid and trapezius muscles (between your neck and your upper shoulder blades) much heavier than regular pushups, for instance. Of course, regular pushups have their own advantage in that they work your chest muscles more prominently.
Disclaimer: if you're of older age, have poor coordination, or have blood pressure issues, I wouldn't recommend practicing this exercise. And because it's impossible for me to list all criteria that should bar you from this exercise, consult with your physician before engaging in any handstand variation.
Once again, let's look at the intensity buildup:
Intensity Buildup For Handstand Exercise:
- Handstand hold. Make a handstand against the wall, keep your arms in the extended position, and hold.
Nothing special, during this first exercise you're simply trying to get used to feeling the pressure of supporting your own bodyweight. For many people, their wrists, elbows, and shoulders have to get used to handling the pressure.
Also, because you're upside-down, there's a psychological issue involved with this exercise involved as well. - Half handstand pushups. Instead of holding your weight, during this exercise, you will lower yourself for a fourth or half of the range of motion and then get back up.
The upper part of the range of motion of this exercise is easiest because your elbows and shoulders are near full-lockdown. Be careful, however, that you're doing this exercise at a safe location - if you cannot complete a repetition due to failure you should still be able to lower yourself in a safe way. - Handstand pushups. For most people doing handstand pushups is impossible. Hence, congratulate yourself when you've achieved this level.
The benefit of this exercise is that you can do it everywhere: every building on this planet has a wall to practice on! - Handstand pushups with gymnastic pushup handles. Pushup handles allow you to achieve a greater range of motion. The problem with regular handstand pushups is that your head prevents you from achieving the full range of motion.
Because of the greater range of motion, these are more difficult. - Free handstand pushups. If you can push yourself up vertically without support of a wall then you're really in a league of your own.
Again, this exercise is best carried out with gymnastic pushup handles because they give you greater control.
Unfortunately, I cannot do these because my balance is not my greatest strength, even though I can do 10-15 regular handstand pushups against the wall or with handles.
Be careful at first with this exercise and ensure you practice on a soft environment first, such as on grass. If you do fall on grass, the damage will be limited. - One-arm handstand pushups. I cannot do these, as well as 99.9999999% of the population. In fact, I've only heard of a very few number of people who have been able to complete a one-arm handstand pushup.
The one-arm handstand pushup is by far the most difficult exercise listed in this bodyweight training guide. Before working up to this option, it's probably best to try 1) one-arm handstand pushups with reduced range of motion; 2) one-arm handstand pushups with aid of your other arm; 3) negative (lowering only) one-arm handstand pushups.
Unfortunately, my personal experience cannot help you with this exercise!
Guidelines For Training Handstand Pushups:
For handstand pushups, most of the same guidelines exist as for regular pushups. For instance, elbow or shoulder injuries can occur if you train/move improperly, and "sagging" around the core is a common reason many people cheat with both types of pushups.
So always ensure that your spine, hips, knees, and ankles are aligned in one straight line.
Also, be mindful of elbow, neck, and shoulder injuries once again. The answer to these injuries is almost universally to 1) use proper form; 2) workout out less so that you recover quicker from workouts.
And that's it: all the most important bodyweight movements explained in detail. Let's move to a few accessory movements that allow you to spice your workouts up:
Accessory Movements: Spice Up Your Workouts
You don't necessarily need to only rely on the exercises I've listed above: below I list a couple of other exercises that you can use to spice your workouts up.
Some people get bored using the same workouts over and over again, and hence, I've included several exercises here as inspiration. Please keep in mind that many other accessory bodyweight exercises exist - you can simply learn more of them by Googling.
Hence, the list below is not meant to be exhaustive. With the primary movements (squats, pushups, pullups, ab exercises, sprints) you're able to challenge yourself forever.
Accessory Movement: Glute Bridges
Main muscles worked: different glute muscles such as the gluteus maximus, medius, and minimus, as well as back and ab muscles around the spine, such as erector spinae and different obliques

Either using two legs or one leg, lift your glutes from the floor.
The 1-leg versions is a lot harder than the 2-leg version. For a more challenging exercise, hold your body for 3-5 seconds on top just like you would do with an abdominal plank.
More difficult variations of these glute bridges will be considered in next installments...
Accessory Movement: Lunges
Main muscles worked: quadriceps (front of legs), hamstrings (back of legs), especially the glutes, calves (several muscles).

Lunges will only be used initially until you've built up the strength for one-arm squats. The benefit of lunges is that they help you build strength in muscles that accord closer to one-leg squats than two-leg variations.
It's best to use lunges once you're accustomed to bodyweight squats.
The most frequently used lunge is one where you take a step forward, and then get back to your place - regularly standing upright on both your feet.
To make lunges harder, however, you can also include side-lunges to target the muscles inside your hips, or lunge by taking a large step backwards.
Another killer is to do walking lunges, with your knee almost touching the floor. That exercise is a killer.
Ultimately, however, lunges will not be challenging enough anymore and you'll have to move to one-leg squats.
Accessory Movement: Bodyweight Triceps Extensions Or "Diamond Pushups"
Main muscles worked: triceps
Triceps extensions are carried out from a pushup position. But instead of moving a lot in your shoulder joint you're mainly moving at your elbow.
For most people, it's better to move your arms closer together than with regular pushups. If you put your hands on the floor and let your thumbs and index fingers touch so that they make a "diamond" sign you've usually got a good grip.
Accessory Movement: Burpee
Main muscles worked: almost every muscle in the human body, except for mid- and rear shoulders and upper back muscles.
Nobody loves burpees because they're so taxing. And yet. burpees get you winded very quickly.
Why?
To complete a burpee, you drop into a pushup, complete that pushup, then get on your feet from that pushup position, and jump vertically into the air. That's one repetition! Once you complete 20 of them, you will have started breathing more quickly.
Varying Workouts: The Possibilities Are Endless
Over time, you can add several types of jumps, spice up your front planks by tapping your shoulders, do clapping pullups, and more.
I could have included far more exercises in this program but I wanted to keep things simple instead. However, if you're a person who likes to keep changing things up then you'll almost certainly be able to find variations on the movements I've described above, such as clapping pullups or different types of planks.
Feel free to add your own exercises to this mix. For instance, you can go through all the main bodyweight exercises first and then finish your workout off with a 20-mile bike ride. The possibilities are endless.
Example Workout Program
Below I've listed a few example workout programs. These programs range from extremely easy (low-intensity) to advanced (for elite athletes).
I didn't list these example workouts for you to blindly follow them. Instead, I've included these workouts as an example of how you can build your own bodyweight training program no matter where you're coming from:
Beginner:
2 rounds of:
- 25 bodyweight squats
- 12 pushups on knees
- 10 horizontal bodyweight rows with stretched knees
- 25-second plank on knees
- 15 glute bridges on 2 legs
If endurance is your main goal, complete these exercises without resting between them. Then after each round, rest for 2 minutes.
If strength is your goal, rest for about 30-60 seconds between each exercise and then move to the next.
Intermediate:
2 rounds of:
- 5 handstand pushups
- 100-meter sprint (if space allows)
- 12 regular chinups
- 15 clapping pushups
- 30-second side plank and 30-second regular plank
- 10 1-leg squats with arm support
- 10 tricep extensions with own bodyweight
Most young people will be wiped at that point! Rest 3-4 minutes between these rounds. Rest 1 minute between the exercises if strength is your goal, or don't rest at all if you want to build up endurance.
Advanced:
2 rounds of:
- 12 handstand pushups without wall support
- 5 one-arm pullup (with help of your other hand for aid)
- 200-meter sprint (if space allows)
- 10 one-arm pushups per side
- 25 one-legged squats
- 12 ab wheel rollouts
If you can complete that workout you're firmly planted in the elite category of strength and conditioning!
But let's not forget the people who don't have very high strength and conditioning skills:
Low-Intensity:
This program is perfect if you're older or in not so great health and just need a way to move.
2 rounds of:
- 15 squats from a couch or chair, with arm support
- 15 pushups against the wall
- 15 crunches while laying on the couch (for safety purposes the exercise is not carried out on the floor
- 15 horizontal rows while holding door handle, standing (very low intensity).
- walk for 200 meters
See? Even a 85-year-old person can get a great workout in from the comfort of their home!
But let's return to my earlier point, on how you need to adjust these programs towards your own goals and capabilities:
Create Your Own Program
You don't have to follow the beginner, intermediary, advanced, or low-intensity workouts to the letter.
In fact, you should be able to create your own program with the exercise progressions I've included above.
The end goal is to simply move to more difficult exercises over time.
How?
Again:
Once you master regular pushups you can start practicing clapping pushups. Once you master bodyweight squats on 2 legs you can try 1-legged squats while using your hands as support.
You get the drill...
Also, make sure to increase the number of repetitions on all of the exercises. Keep track of what numbers you hit over time by journaling.
If you're now able to do a 40-minute regular plank, aim to build up to 45 or 50 seconds the next month. One month after that you may be able to hold the plank for a minute.
Another example are pushups. Maybe you can do 15 pushups on your knees right now. But once you build up to 25 pushups over a period of 2 months, you'll be able to switch to regular pushups and crank out 4-5 repetitions. Be proud! By practicing these regular pushups over time, you'll be able to build up to many more...
Anyone can do these exercises and progress over time. Always make sure that safety comes first though - if you get injured you can wipe out months if not years of progress:
Warming Up?
Most people should do a warmup before going all out. Warmup here means that you'll select less intense variations of the exercise you're aiming at.
So if you regularly do clapping pushups, it's better to warm up with regular pushups.
You get the drill...
Unless you know your body very well, you should not start your workouts without warming up. So my recommendations is to go through the entire list of exercises first, choosing the easier variations of the movement you're finally aiming at...
Let's also talk about intensity...
Intensity: Only 2 Rounds? Shouldn't I Workout For 1-2 Hours A Day?
The sample workouts I've listed don't take you 40 or 90 minute to complete. instead, 10-25 minutes is more than enough to get a good workout in.
At Alexfergus.com, we believe that overtraining is a major danger and that less is more with regards to workouts, in most cases. In fact, training very heavy for long periods of time probably reduces your overall health.
If you'd like to learn more about that idea, consider the Fitness & Training resource page.
The bottom line is that very heavy and very quick workouts, 1-2 times a week, are probably perfect for your health. Fewer workouts than that number, as well as more frequent ones, reduce the health benefits.
Hence: only 2 rounds of intense bodyweight exercises is all you need, while working out 1-2 times a week. No need to spend hours in the gym.
And with 1-hour of workouts per week, there's literally no excuse on the planet why you cannot start bodyweight workouts this week! You deserve the best...
Let's conclude:
Finishing Thoughts: Home Workout Programs Are Thoroughly Underappreciated!
Remember January 1st several years ago, when many people get a gym membership for a year? Most of these people don't turn up to the gym anymore in February, even though they still keep paying.
A less risky approach?
Start training at home! You need nothing to begin with, so no excuses exist in trying such as program for a short period of time - especially if you're doing nothing right now!
Bodyweight training has literally be used for thousands of years in cultures like Greece and India to gain endurance and strength.
When applied properly and with continuous progressive overload, you can build quite the perfect athletic body with body weight training only.
Of course, saving time is yet another huge benefit to home workouts. Traveling to the gym costs many people around 30 minutes, which is the same time you can be done with this workout.
A much better you, in 1 hour a week. Isn't that a great offer?
Items Mentioned:
- Pushup handles for increasing the range of motion.
- Gymnastic rings for horizontal bodyweight rows with 1 or 2 arms, pullups, and even pushups with extended range of motion.
- Gymnastic pushup handles for safe handstand pushups against the wall.
- TRX-handles which are great for all kinds of exercises, such as pullups, chest flyers, pushups with increased range of motion, 1-leg assisted squats, etcetera, and even a few exercises not included in this guide.
- Plastic bands for making pushups harder, or pullups easier/harder, depending on how you use them.
- Ab wheel for an extremely difficult ab exercise. Heck, for $15-20 you get world-class ab training for the rest of your lifetime!
This is a post by Bart Wolbers. Bart finished degrees in Physical Therapy (B), Philosophy (BA and MA), Philosophy of Science and Technology (MS - Cum Laude), and Clinical Health Science (MS), and is currently the chief science writer at Alexfergus.com.
Found This Interesting? Then You Might Like:
- Body By Science High-Intensity Training Review: My 9 Month Experiment
- 11 Reasons Why You Need To Lift Heavy For Fat Loss
- 29 Proven and Effective Ways to Boost Testosterone Naturally
Get FREE Updates & EXCLUSIVE Content
Join Over 30,000+ Subscribers!


Join 10,000's of others and receive exclusive news and updates!

Looking For The Best Red Light Panels?
I've studied the science and tested the panels and put together this Red Light Therapy Resource & Deals Page